Enroll Employees (Users)
Each of your employees will need to have an unique ID number assigned to them. This ID number can be assigned by the hardware device automatically during the user enrollment process or usually the operator can set a number up that they already use such as a payroll number.
The unique ID number must be a number from 1 to 9999999+, number 0 and letters are not allowed.
Normally enrollment would be done directly on the machine if its a biometric finger of face machine. Then after enrollment the software can sync with the device and transfer users details to the software automatically.
Note: The device doesn't record a users fingerprint only a unique serial number called a template.
The exact procedure of enrollment will depend on the time clock device, so you should refer to the devices specific user guide. Normally an admin manager would enter the menu on the device select the User sub menu and select Enroll user. At that point they can use the next available ID number on the time clock or enter their own number to identify the user. followed by scanning fingers or swiping cards etc.
Enrollment is usually only done once, but can be done again at a later date, in which case you can delete the user and then re-enroll the user again making sure you keep the same user ID number.
- Once you have enrolled a user and assigned them their own ID number, do NOT change this number! Unless you no what you are doing!
Be careful enrolling users, because during the process on some devices you can set the users role to be an Admin or Normal. If you set as admin then the machines menu system will be come locked and you won't be able to access that menu without that users credentials!
As a general rule we recommend for each user you enroll multiple identification methods is the device supports it, such as more than one finger or finger and an RFID card or password PIN.
For Admin users on a device you should definitely set more than one user as admin, just in case one user is away or sick etc. You should also set a password PIN or Card so other managers in future can access the device.
''' If you enroll an admin and forget the credentials, usually the only way of getting access to the device is from the software. So make sure the software is installed and working with the device before you start enrolling people! '''
Clocking or Punching IN and OUT
Each model of time clock device can be different but the basic principle is the same.
Users should select IN or OUT on the time clock device with the arrow or function keys first (if supported on the model of time clock), Usually the time clock display will change to say IN or OUT.
This step is usually not critical as the ClockReports software can automatically workout if someone is coming or going when running most of the standard reports.
However we recommend that your employees do it this way because it helps when viewing a report timesheet to see accurate data, and if an employee is working over midnight it helps to see in the report the actual coming and going of employees.
In the most of the reports the actual colour of the font in the report will change to indicate the state of the time clock when the employee punched.
After the employee has changed the sate of the device then they can punch on the device, this will depend on the device but it could be by biometrics fingerprint or face recognition, RFID card or tag or a password PIN code. Refer to the devices manual for operating instructions.
Software Home Screen
The panel has a number of buttons and display panels...
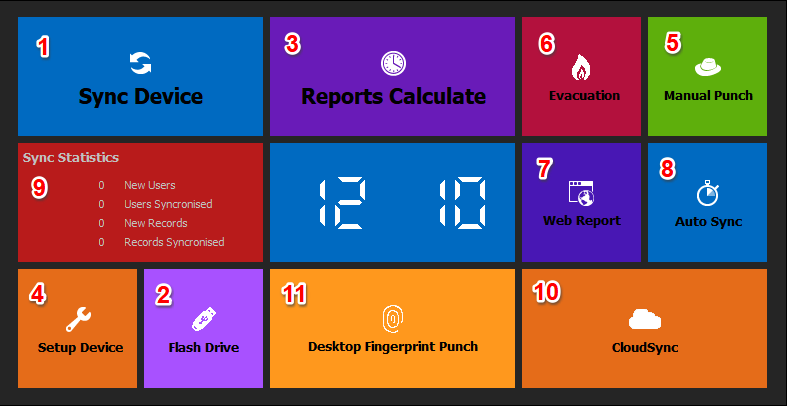
Button 1: Used to download users and punch records from the hardware device either over a Network or USB cable connection.
Button 2: Used to import, users, punch records and user templates from a USB flash memory pen drive.
Button 3: After using Button 1 or 2 above you use this button to calculate a report.
Button 4: Used to configure the device communications with the software.
Button 5: Used to manually clock a user in or out if they were unable to on the device.
Button 6: Generates an evacuation report by syncing and automatically printing a list of users and their punch details.
Button 7: Opens up a web browser to connect to built-in web server, where users can punch and reports, evacuation lists can be viewed remotely.
Button 8: Here you set the software to do things automatically at set times of day etc.
Button 9: Shows details after Sync or flash drive import.
Button 10: Connects to the Cloud based version of our software for data syncing.
Button 11: Punch users in or out with a desktop USB fingerprint reader attached to computer.